

What should you do when you buy a brand new Canon imageCLASS MF462dw Printer? The Canon MF462dw is an all-in-one multifunctional printer that can print, copy, scan and fax. To take advantage of its full capabilities, you also need to set up its system and services. This blog post provides several options for how to setup Canon printers to computer and answers some questions users may have.
Why setup the Canon imageCLASS MF462dw
Before giving tips for how to setup Canon printers, we need to know why we setup them. Setting up the Canon imageCLASS MF462dw is necessary for several reasons:
1. The brand-new Canon printers do not come with their drivers. Installing the printer driver is essential. It allows your computer to communicate with the Canon printer and enables you to perform various printing tasks.
2. Setup allows you to customize various printer preferences, such as paper size, print quality, and color settings, which ensures that what you print is exactly what you want. After installing the driver, there are default printer properties. However, depending on the specific use case, users may need to adjust the default settings. Faced with different printing requirements, the default settings may not produce ideal printing results.
3. Setting up a printer also includes ensuring its security. It includes enabling secure printing features, such as password-protected printing, and configuring access controls to limit unauthorized access. In addition to that, if you encounter any issues with your printer, setting it up properly can help you troubleshoot and resolve the problem more effectively.
Some Preparatory Work Before Setup
Before setting up a new Canon imageCLASS MF462dw printer, there are several preparatory steps that you can take to ensure a smooth and successful setup process:
1. Specifying the Basic Settings
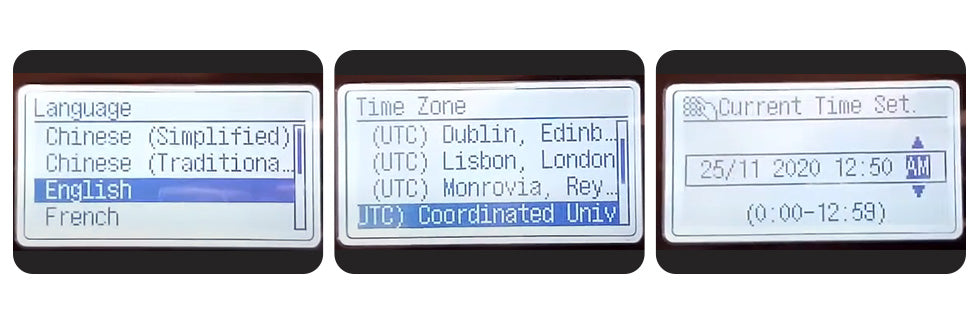
Once you've assembled the printer, please place it in a convenient space. Then, please connect the Canon printer with a power cord and press the printer's switch button. When you first turn on the machine, there will be setup guide appears on the control panel. Then, just follow the onscreen instructions for the initial machine setup.
The basic settings include the language, the country or region, and the time zone. Set the current time and date according to the actual situation to simplify the operation process.
2. Specifying the Security Settings
By setting Remote UI for your Canon printer, you can help ensure that it remains secure and protected from unauthorized access or tampering. Remote UI for a Canon printer typically refers to a web-based interface that allows users to remotely access and control the printer's settings and functions.
a. To use the Remote UI, select “Yes”.
b. To use General User mode, select “Yes”.
c. Set the Remote UI Access PIN.
• Enter any number and then select “Apply”.
• Re-enter to confirm the same PIN on the next screen and select “Apply”.
* Do not forget your PIN.

3. Specifying the Network Settings
Printer networking is also an essential link. There are two ways to connect to the network: wireless and wired. Please note that you cannot use a wired LAN and a wireless LAN at the same time.
a. Wireless Connection
• Check the router's "SSID" and "Network key."
• To configure the settings, select "Yes" on the operation panel.
• Select the network with a matching SSID.
• Enter the password or network key and select "Apply."
b. Wired Connection
Connect the router to the machine with a LAN cable and then select "No" on the screen to choose how to connect to the network.
How To Setup Canon MF462dw Printer In A Wireless Way
The process of setting up the body of the Canon imageCLASS MF462dw is not complicated. It is simple and convenient to make it through the wireless network. Moreover, the wireless setup can also be divided into WPS connection and standard connection method according to whether the router comes with WPS function or not. How to setup Canon printer to WIFI? Please continue to read the following content.
1. Make sure the Canon printer is turned on and connected to the same wireless network as your computer
- WPS Network Setup
WPS Network includes WPS Push Button Mode and WPS PIN Code Mode.
-WPS Push Button Mode:
a. Open the menu on your Canon printer. Look for "WPS Push Button" mode.
b. Your printer will start searching for wireless networks after selecting "Yes" in the operation panel.
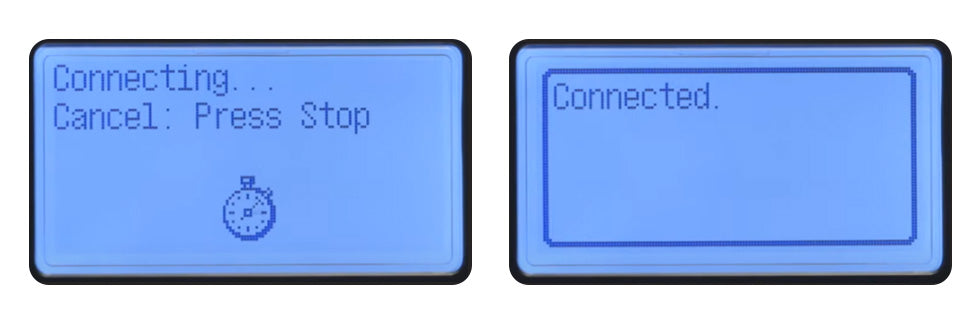
c. Check the Wi-Fi indicator light on your printer. When it starts blinking, it means your printer has found a wireless network.
d. Wait for about some minutes for your printer to automatically acquire the IP address of the wireless network.
e. Your printer screen should display "Connected" if it has successful completion of networking.
-WPS PIN Code Mode:
This pattern is probably a bit more tedious than Push Button.
a. In this mode you first need to access the wireless router through your computer and reach the screen to enter the WPS PIN code.
b. Then, look for "Wireless LAN Settings" on the printer's touch screen, and you'll find "WPS PIN Code Mode."
c. When the screen appears: Do you want to connect using new settings? Select "Yes" and the printer will automatically generate an 8-digit PIN.
d. Enter this string of numbers into the WPS PIN Code window of your computer within 10 minutes and wait for the two devices to connect. If the printer control panel shows "Connected", the connection is successful.
- Standard Network Setup
It doesn't matter if the router doesn't have WPS capabilities. Standard network Settings are also available for your Canon MF 462dw printer. The first step corresponds to the network settings in the preparatory work. Here are some more details to make it clear to you.
a. After powering on the printer, find "Menu" in the control panel and select "Network Setting".
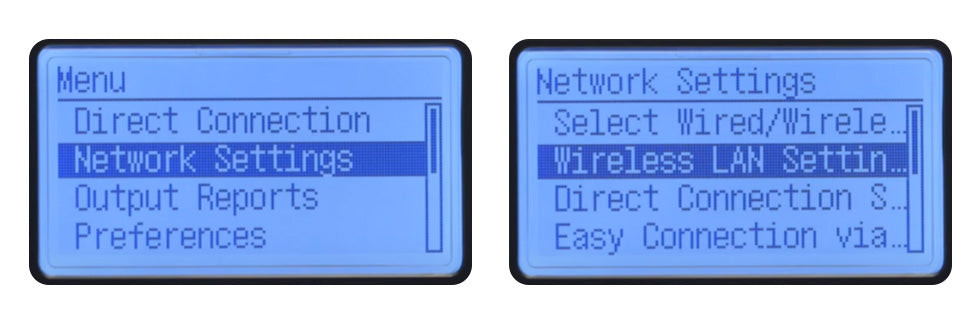
b. Click "Wireless LAN Settings" and "SSID Settings" will appear.
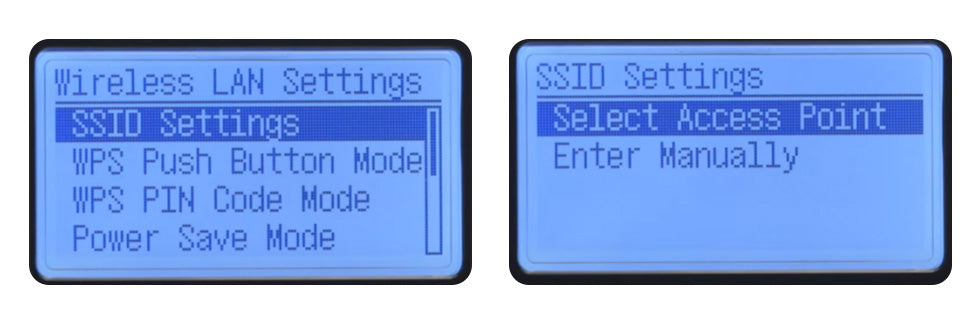
c. Select "Select Access Point" and a list of wireless networks will appear. Select the network you are using.
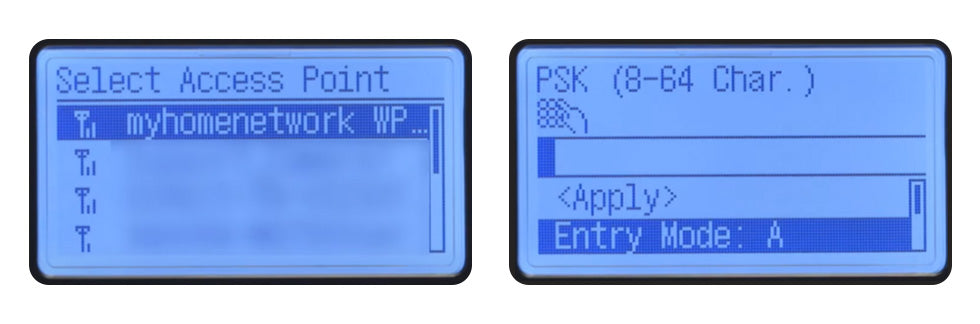
d. After entering the password, the screen shows "Connected", which means the connection is successful.
e. Through the "Start" menu of your computer, please click "Device" option in "Settings", select "Printer & Scanner", choose the Canon imageCLASS MF462dw connected to it, add it to your computer, and then finish other settings of the device and start printing.
PS: Canon printers need to be connected to the same wireless network as the computer, possibly because the printer needs network configuration or updates. By connecting the printer to the same wireless network as the computer, it can be accessed and set up from the computer using a web browser. This connection allows you to use the printer more conveniently, and you can connect the printer to other devices, such as phones and tablets, through network sharing.
2. Download and install the software files to your computer
Once you are connected to the Internet, you will need to download the Canon printer driver on your computer, as follows:
a. Open your Google browser and enter the website address of official Canon, or search for "Canon official website" in a search engine.
b. Click the "Support" option at the top of the page and enter your printer model in the search box, like "Canon MF 462dw", or filter by product type/series/model.
c. Find your printer model in the search results and click the "Software & Drivers" option.
d. Select the appropriate driver version for your operating system and language, then click the "Download" button.
e. Save the downloaded files to your computer, preferably a desktop or other easily accessible location.
f. Open the download folder and double-click the driver file to begin the installation process.
g. Following the prompts of the installation wizard generally requires agreeing to the license agreement, selecting the installation location, connecting the printer, and other steps.
Once the installation is complete, you can start testing whether the printer can print correctly.
Instructional Video For Windows:
3. Some differences in operation for Windows and Mac users
If you're on MacOS, the setup process is a little different. It is mainly reflected in the download of printer drivers and the addition of printer devices on the computer. When downloading drivers from the Canon website, it is important to identify the right files for MacOS. Otherwise it may not be installed on your computer. Then, how do Mac users add Canon printers to their computers?
a. Select System Preferences after clicking the Apple icon, and then select Printers & Scanners.
b. Select the + symbol to add a printer.
c. In the available list, select your printer model and add it.
d. If it is a router, connect the Mac device and the printer to the same network.
Instructional Video For Mac:
How To Setup Canon MF462dw Printer In A Wired Way
In addition to setting up the printer wirelessly via WIFI, you can also make it via a USB cable.
1. Download the appropriate driver from the Canon website according to operation systems
No matter how you connect to the network, the first thing you do is download the printer driver. We describe the download and installation steps in detail when discussing the wireless approach. In addition, if you have bought a new Canon MF462dw, you will find a CD drive in the product box. You can load the CD/DVD-ROM into your computer. Then, the computer will download the setup files automatically.
2. Connect the Canon printer to your computer with a USB Cable
When you select the connection method during installation, remember to choose "USB Connection". Then, you can connect the USB cable to the rear of the printer and the computer's USB port. Before that, please remember to turn on the Canon printer. After connecting the two devices, you can click "Next" and wait for a moment to complete the installation.
3. Configure your printer settings and print a test page
In order to ensure that the printer is set up successfully, we generally refine the basic properties of the print page after installing the driver, and print the test page to test Canon MF462dw whether it is set up successfully. Because you learned how to add a printer to your computer, it's easy to print the test pages.
• For Windows: Find Canon imageCLASS MF462dw in the list of added devices; right-click on the corresponding printer driver icon; find the printer property in the pop-up window, and select Print test page.
• For Mac: Click the printer from the list on the left then click Options & Supplies; click the Utility tab along the top of the window, and then click Print Test Page.
If the printing results are in line with the forecast, you have a successful printer setup.
Instructional Video:
Can You Change Other Settings After Finishing Canon MF462dw Setup?
Some MF462dw users may ask: Can I adjust other printer settings after the first setup? The answer is yes! The setup process typically includes connecting the printer to your computer or network, installing the printer driver software, and configuring the printer's basic settings. After the setup is complete, you can access additional printer settings and make changes to various print options. The specific steps for changing other settings vary depending on your printer model and operating system. For the Canon MF462dw printer, you can typically access these additional settings through the printer driver software or the printer's user interface on your computer. Some examples of additional settings you can change after setup include: print quality; paper size and type; color options; print queue or priority; duplex printing and network settings.


3 comments
True Image
@tim
Hi Tim. Thanks for your comment. This issue is often caused by a misconfiguration in the paper size settings, leading the printer to default to a single size. Here are a few ways to help resolve this:
1. Adobe Acrobat Reader Settings: go to File > Print, and ensure “Page Sizing & Handling” is set to “Actual size” or “Fit.” Also, check “Choose paper source by PDF page size” to ensure the correct tray is used for each page size.
2. Update Printer Driver: Your printer driver may not be configured correctly to handle different paper sizes. Check if your Canon MF462dw driver is up to date. If not, reinstall the latest driver from Canon’s website.
3. Printer Tray Settings: If your printer has more than one tray, on the printer’s control panel, make sure trays are assigned to the correct paper sizes (e.g., Tray 1 for Letter, Tray 2 for Legal) and enable “Auto Tray Switching.”
4. Printer Preferences in Windows: Go to Settings > Devices > Printers & Scanners, select your printer, and ensure the paper source is set to “Automatically Select.”
Best regards,
True Image Team
tim
printing from windows 11 to canon mf46dw. cannot get printer to print different size pages, ie legal and letter, as in loan documents. also using adobe acrobat reader. select auto paper select by size. only prints 1 size.
tim
printing from windows 11 to canon mf46dw